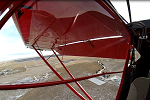
Here is a few shots to see how it is coming. This is not long after I sprayed. The finish will smooth out a bit more as it drys.

Here you can see the quality. I think it is ok.

One thing I have found is I do not get a smooth finish on the wet coat right out of the gun like I thought I should. I tried many settings and all give the same results. As long as you got it shiny 2 seconds or so after the gun, it works. The paint smooths out as it drys. So everytime I think I screwed it up it is fine. I think the main thing is really make sure you have full colour saturation. If you get that, the wait coat combined with the fog coat will get you a good finish. I am guessing here, but it looks like it is working that way for me. All surfaces have been done on a vertical, so the flats may be different.
Here you can see the wing roots and the windsheild/skylight support in the back ground. I added nut plates to them for easy windshield installation. These small parts take a lot of paint and are not the simplest of spray jobs.

Here you can see the turtle deck and gear leg. I used the ecoetch and the ecoprime. They worked out well on the aluminum parts.

One thing about the paint is you have a very slight textured look, very slight orange peal. I tried many different gun settings and I got the same results each time. Now I am going with the setting that uses the least amount of paint to keep the weight down. One thing for sure, it is really shiny!
The fuse should hit the booth soon! Just want all the small parts done first.