

Ok... I guess I need a topic for FINAL ASSEMBLY...
This thread is taking funny turns at first , but starting to focus better
It all started because I need REAL HARDWARE to put the Engine/Gear Mount,
I'm painting it between cold weather.
I'm hoping to Git'r back on her gear soon.
Talked to the guys at Buttercup STOL , just to be sure of several things...
They are a great source for Wittman info
I made a clothes rack for the wife...
It came in handy to paint the Engine Mount
I was able to turn it over to finish spraying all in one shot
She's not using it during Winter.
.
Gotta Fly...
JAM
PS The Rack was able to WALK with the Mount...
One foot steps...From outside to inside
Final Assembly ( In Progress )
-
planecrazzzy
- Site Admin
- Posts: 1154
- Joined: Sat Jan 01, 2005 1:23 pm
- Location: Minnesota
- Contact:
Final Assembly ( In Progress )
You do not have the required permissions to view the files attached to this post.
Sometimes you just have to take the leap
and build your wings on the way down...
Gotta Fly...
and build your wings on the way down...
Gotta Fly...
-
planecrazzzy
- Site Admin
- Posts: 1154
- Joined: Sat Jan 01, 2005 1:23 pm
- Location: Minnesota
- Contact:
Re: Final Assembly
Hey Guys,
I got it Epoxy Primer and Epoxy White Paint...
I wanted to keep it like the fuselage , This should make any crack visible EASY...
The slight oil inside the tubes will "Weep" if anything cracks.
I didn't add oil... it's already coating the tubes..
.
I ordered some Bolts ,Castles and Flat washers
I'll be ready to Put the Landing gear on too.
.
Gotta Fly...
.
Qty Ship B/O Item Unit Price Total Price
4 4 0 AN6-36 BOLT DRILLED AN6-36 1.990 7.96
12 12 0 AN960-516 WASHER, FLAT AN960-516 0.040 0.48
20 20 0 AN960-616 WASHER, FLAT AN960-616 0.040 0.80
12 12 0 AN960-516L NAS1149F0532P WASHER, FLAT 0.030 0.36
20 20 0 AN960-616L WASHER, FLAT AN960-616L 0.030 0.60
8 8 0 AN310-5 NUT, CASTLE AN310-5 1.050 8.40
8 8 0 AN310-6 NUT, CASTLE AN310-6 1.230 9.84
2 2 0 AN5-21 BOLT DRILLED AN5-21 1.080 2.16
Subtotal: USD 30.60
Shipping: 10.10
Sales Tax: 0.00
Other Charges or Credits: 0.00
Total: USD 40.70
You do not have the required permissions to view the files attached to this post.
Sometimes you just have to take the leap
and build your wings on the way down...
Gotta Fly...
and build your wings on the way down...
Gotta Fly...
-
planecrazzzy
- Site Admin
- Posts: 1154
- Joined: Sat Jan 01, 2005 1:23 pm
- Location: Minnesota
- Contact:
Re: Final Assembly
Hey Guys,
After finding out that my Torque chart for AN Bolts was WAY off...
The Guys at Buttercup/STOL straightened me out with the Correct Chart.
So my range for AN6 is 160 -190 in pounds
I torqued the 4 Engine Mount bolts to 175 in lb
Then took the castle to the next opening for the cotter pin.
The cotter pin in this picture was left long and "Tucked" because
I can see it will be a high traffic area for a while.
it's less likely to SNAG like this.
But then again...it looks like crap after seeing the picture
I might cut it like normal and put a spot of High temp Silicone to do the job.
.
Gotta Fly...
.
You do not have the required permissions to view the files attached to this post.
Sometimes you just have to take the leap
and build your wings on the way down...
Gotta Fly...
and build your wings on the way down...
Gotta Fly...
-
planecrazzzy
- Site Admin
- Posts: 1154
- Joined: Sat Jan 01, 2005 1:23 pm
- Location: Minnesota
- Contact:
Re: Final Assembly
',
Milestone
She's on her GEAR...again
Milestone
She's on her GEAR...again
You do not have the required permissions to view the files attached to this post.
Sometimes you just have to take the leap
and build your wings on the way down...
Gotta Fly...
and build your wings on the way down...
Gotta Fly...
-
planecrazzzy
- Site Admin
- Posts: 1154
- Joined: Sat Jan 01, 2005 1:23 pm
- Location: Minnesota
- Contact:
Re: Final Assembly
.
Got the rudder operating smooth...
Had to clean a little paint in the tubes , then gave it a light coat of oil
The other picture shows me symmetrical even ?...
and the Tail wheel lines up good.
.
Gotta Fly...
Got the rudder operating smooth...
Had to clean a little paint in the tubes , then gave it a light coat of oil
The other picture shows me symmetrical even ?...
and the Tail wheel lines up good.
.
Gotta Fly...
You do not have the required permissions to view the files attached to this post.
Sometimes you just have to take the leap
and build your wings on the way down...
Gotta Fly...
and build your wings on the way down...
Gotta Fly...
-
planecrazzzy
- Site Admin
- Posts: 1154
- Joined: Sat Jan 01, 2005 1:23 pm
- Location: Minnesota
- Contact:
Re: Final Assembly
.
Cleaned up the SS brackets and mounted the Fuel Tank.
I'm going to fill it with water and drain it...
Find exact volume , and useful load.
But I'll wait till the temperature is warmer.
Here's some pix
.
Gotta Fly...
Cleaned up the SS brackets and mounted the Fuel Tank.
I'm going to fill it with water and drain it...
Find exact volume , and useful load.
But I'll wait till the temperature is warmer.
Here's some pix
.
Gotta Fly...
You do not have the required permissions to view the files attached to this post.
Sometimes you just have to take the leap
and build your wings on the way down...
Gotta Fly...
and build your wings on the way down...
Gotta Fly...
-
planecrazzzy
- Site Admin
- Posts: 1154
- Joined: Sat Jan 01, 2005 1:23 pm
- Location: Minnesota
- Contact:
Re: Final Assembly
.
Both rear windows were installed with Red Loctite and lock washers.
After,the frame area overspray was cleaned up using Lacquer thinner,
I polished the little aluminum angles that hold the plastic in place.
Since I experimented with the whole rear window in place, I wasn't sure about it's strength through FABRIC tension.
It held up good , and now it's stronger with the plastic and angles bolted in place.
.
Gotta Fly...
You do not have the required permissions to view the files attached to this post.
Sometimes you just have to take the leap
and build your wings on the way down...
Gotta Fly...
and build your wings on the way down...
Gotta Fly...
-
planecrazzzy
- Site Admin
- Posts: 1154
- Joined: Sat Jan 01, 2005 1:23 pm
- Location: Minnesota
- Contact:
Re: Final Assembly
.
Taper spring rod and Full Swivel parts Blasted or cleaned.
Then Painted Epoxy Primer ,...Oiled lightly...and cotter pins
Safety wired the Bolt under the Fuselage holding the tapered rod.
( I welded a little tab for it )
.
Gotta Fly...
Taper spring rod and Full Swivel parts Blasted or cleaned.
Then Painted Epoxy Primer ,...Oiled lightly...and cotter pins
Safety wired the Bolt under the Fuselage holding the tapered rod.
( I welded a little tab for it )
.
Gotta Fly...
You do not have the required permissions to view the files attached to this post.
Sometimes you just have to take the leap
and build your wings on the way down...
Gotta Fly...
and build your wings on the way down...
Gotta Fly...
-
planecrazzzy
- Site Admin
- Posts: 1154
- Joined: Sat Jan 01, 2005 1:23 pm
- Location: Minnesota
- Contact:
Re: Final Assembly
.
Blasting and Epoxy Primer.
.
Next will be ordering the right hardware
(after blasting and painting more little parts)
.
Gotta Fly,,,
Blasting and Epoxy Primer.
.
Next will be ordering the right hardware
(after blasting and painting more little parts)
.
Gotta Fly,,,
You do not have the required permissions to view the files attached to this post.
Sometimes you just have to take the leap
and build your wings on the way down...
Gotta Fly...
and build your wings on the way down...
Gotta Fly...
-
planecrazzzy
- Site Admin
- Posts: 1154
- Joined: Sat Jan 01, 2005 1:23 pm
- Location: Minnesota
- Contact:
Re: Final Assembly
.
Blocks were a snug fit and Drilled for safety wire.
They are safety wired to the strap.
It should help support the VOID when holding 30 gals of fuel.
.
Gotta Fly...
Blocks were a snug fit and Drilled for safety wire.
They are safety wired to the strap.
It should help support the VOID when holding 30 gals of fuel.
.
Gotta Fly...
You do not have the required permissions to view the files attached to this post.
Sometimes you just have to take the leap
and build your wings on the way down...
Gotta Fly...
and build your wings on the way down...
Gotta Fly...
-
planecrazzzy
- Site Admin
- Posts: 1154
- Joined: Sat Jan 01, 2005 1:23 pm
- Location: Minnesota
- Contact:
Re: Final Assembly
This view shows why I put an extension on the Flap Horn...
Helps things stay "In-Line"...Flaps can get a lot of pressure.
I've tried to pay special attention to this area.
.
I had more hardware to mount some Rudder Pedals too.
Gotta Fly...
Another Hardware order from A.S.S
.
I ordered a few EXTRA things of the common sizes
This should finish the Rudder Assy , Ailerons and Flap controls.
.
8 8 0 AN393-13 CLEVIS PIN AN393-13 0.590 4.72
8 8 0 AN393-19 CLEVIS PIN MS20392-2C19 0.530 4.24
50 50 0 AN960-10 WASHER, FLAT AN960-10 0.020 1.00
50 50 0 AN960-416 WASHER, FLAT AN960-416 0.030 1.50
20 20 0 AN960-10L WASHER, FLAT AN960-10L 0.020 0.40
20 20 0 AN960-416L WASHER, FLAT AN960-416L NAS1149F0432P 0.020 0.40
6 6 0 AN3-6 BOLT DRILLED AN3-6 0.590 3.54
6 6 0 AN3-7 BOLT DRILLED AN3-7 0.630 3.78
12 12 0 AN310-3 NUT, CASTLE AN310-3 0.620 7.44
20 20 0 AN310-4 NUT, CASTLE AN310-4 0.890 17.80
30 30 0 MS24665-132 COTTER PIN AN380-2-2 0.020 0.60
20 20 0 AN4-10 BOLT DRILLED AN4-10 0.690 13.80
Subtotal: USD 59.22
You do not have the required permissions to view the files attached to this post.
Sometimes you just have to take the leap
and build your wings on the way down...
Gotta Fly...
and build your wings on the way down...
Gotta Fly...
-
planecrazzzy
- Site Admin
- Posts: 1154
- Joined: Sat Jan 01, 2005 1:23 pm
- Location: Minnesota
- Contact:
Re: Final Assembly
.
I got another Hardware order today.
Wow... This is almost $80 bucks...
Luckily , I don't need much more "AN Hardware"
I can use local stuff for Panel and other Misc.
even light nylon screws if I wanted.
I used Clevis pins on the rudder linkage.
I put the cotter pins on the outside.
.
I could have used "one" linkage per assembly.
I would have needed Bolts ,Castles ,washers and cotter pins
and a big washer covering the cable loop.
Gotta Fly...
Buyer BEWARE...
Here's a review I wrote at A.S.S. , But I think the "PR Nazis" are NOT going to let the review be posted.
"Oh great... I used the cotter pins... About 10 so far , I noticed my rudder pedals weren't quite Lined-up... So I took off the cotter pin... made my adjustment , grabbed a NEW cotter pin... When I when to fold this one around the clevis pin... Like the others... It SNAPPED OFF... Hmmm, Hope they don't do that at 5000ft . Gotta Fly..."
You do not have the required permissions to view the files attached to this post.
Sometimes you just have to take the leap
and build your wings on the way down...
Gotta Fly...
and build your wings on the way down...
Gotta Fly...
-
planecrazzzy
- Site Admin
- Posts: 1154
- Joined: Sat Jan 01, 2005 1:23 pm
- Location: Minnesota
- Contact:
Re: Final Assembly
.
Floor pans are getting prepped and installed.
SS screws into Steel tabs , means Anti-seize...
Is it possible to work with that stuff without it getting everywhere ?
.
Since I can't use loctite on these,
After I start the screws , I use a toothpick and get silicone under the head..
.
I've spaced all my panel "tabs" to add a vulcanized steel washers...
But... putting them in place after FABRIC is a new obstacle.
First, I fished each one into place... Hmmm...
Next panel I took some skinny tape and held them all in place.
That works.
Gotta Fly...
.
.
You do not have the required permissions to view the files attached to this post.
Sometimes you just have to take the leap
and build your wings on the way down...
Gotta Fly...
and build your wings on the way down...
Gotta Fly...
-
planecrazzzy
- Site Admin
- Posts: 1154
- Joined: Sat Jan 01, 2005 1:23 pm
- Location: Minnesota
- Contact:
Re: Final Assembly
.
I've got the Brake cyls in place...
They will still need plumbing , I should be able to do that where they are.
.
I was then able to put the last floor pan in place.
.
Of course , then I had to put the seat in and check how the rudder pedals felt.
I love the HALF brake pedals.
Flying Cessna I remember how hard it was NOT to touch the brakes...
Gotta Fly...
You do not have the required permissions to view the files attached to this post.
Sometimes you just have to take the leap
and build your wings on the way down...
Gotta Fly...
and build your wings on the way down...
Gotta Fly...
-
planecrazzzy
- Site Admin
- Posts: 1154
- Joined: Sat Jan 01, 2005 1:23 pm
- Location: Minnesota
- Contact:
Re: Final Assembly
.
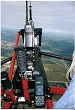
I'm getting the Heim connections in place , SMOOTH operation...NO SLOP
.
Making sure to have a big washer on the open side of the Heim for safety.
Cotter pins in the castles , and Paint mark on the JAM nuts.
Moving all the controls at once... There's a lot of action in a small area.
Plenty of clearance in every direction.
.
Gotta Fly...
You do not have the required permissions to view the files attached to this post.
Sometimes you just have to take the leap
and build your wings on the way down...
Gotta Fly...
and build your wings on the way down...
Gotta Fly...