

.
After putting all the cotter pins in place on the controls...
and having a problem with them.
I went back to look at them with a microscope camera hooked to the Laptop.
Bolts go down and back is "the rule"
Cotter pins go down.
That's one reason I didn't see the real bad one...
Yes... that's a giant crack in the Right Aileron control rods cotter pin. (Scary)
I will remove these later, ALL of them.
But for now I'll leave them until after the FAA investigation into this is over.
I've put a big red tag /note by the control rods
There are more bad ones... These are samples of what they look like.
Some only have hair line crack/fractures at the bent over area.
SOME...Look ok ? I don't trust any of them.
.
Gotta Fly...
Final Assembly ( In Progress )
-
planecrazzzy
- Site Admin
- Posts: 1154
- Joined: Sat Jan 01, 2005 1:23 pm
- Location: Minnesota
- Contact:
Re: Final Assembly
You do not have the required permissions to view the files attached to this post.
Sometimes you just have to take the leap
and build your wings on the way down...
Gotta Fly...
and build your wings on the way down...
Gotta Fly...
-
planecrazzzy
- Site Admin
- Posts: 1154
- Joined: Sat Jan 01, 2005 1:23 pm
- Location: Minnesota
- Contact:
Re: Final Assembly
.
I put a RED TAG/SIGN on the control area.
I can't mess with it for a while.
I guess I'll work on the panel.
I have copies of the instrument faces stuck on it.
I think I'll change it.
I'm planning on doubling some of the area around the 3 inch holes
.
no pix yet
I put a RED TAG/SIGN on the control area.
I can't mess with it for a while.
I guess I'll work on the panel.
I have copies of the instrument faces stuck on it.
I think I'll change it.
I'm planning on doubling some of the area around the 3 inch holes
.
no pix yet
Sometimes you just have to take the leap
and build your wings on the way down...
Gotta Fly...
and build your wings on the way down...
Gotta Fly...
-
planecrazzzy
- Site Admin
- Posts: 1154
- Joined: Sat Jan 01, 2005 1:23 pm
- Location: Minnesota
- Contact:
Re: Final Assembly
Not everything is re-assemble.
I've been working on the Panel lay-out
and instrument clearance from the panel to the fuel tank.
Also keeping all the static air instruments on one side with the compass.
The electric instruments on the other side of the Transponder and Panel GPS
I was going to make small /removable sections in the panel...
But I think I'll wait on that...
I have simple instruments... and easy access.
.
I'll put some picture here once I have some holes in the panel
By the way, after working for Aircorps Aviation...I'll be cutting my instrument
holes with a die grinding carbide bit an fine tune with a file.
It's the most precise for what I have.
I bought a fly cutter... Maybe I can rough cut a smaller diameter first.
.
Gotta Fly...
JAM
You do not have the required permissions to view the files attached to this post.
Sometimes you just have to take the leap
and build your wings on the way down...
Gotta Fly...
and build your wings on the way down...
Gotta Fly...
-
planecrazzzy
- Site Admin
- Posts: 1154
- Joined: Sat Jan 01, 2005 1:23 pm
- Location: Minnesota
- Contact:
Re: Final Assembly
Getting the holes cut out takes some time...
The basic hole is done , But two of the instruments have to be custom cut for a knob and access to an adjustment screw ( Alt & VSI )
I "Fly-Cut" the hole about 1/4 inch shy.... Then used a carbide bit to get closer...
A little filing... and topped off using a big flapper wheel (40 grit)
I've drilled the mounting holes...
.
Soon I'll have something that looks like a Panel
.
.
Gotta Fly...
JAM
.
.
You do not have the required permissions to view the files attached to this post.
Sometimes you just have to take the leap
and build your wings on the way down...
Gotta Fly...
and build your wings on the way down...
Gotta Fly...
-
planecrazzzy
- Site Admin
- Posts: 1154
- Joined: Sat Jan 01, 2005 1:23 pm
- Location: Minnesota
- Contact:
Re: Final Assembly
Some instruments in...
and fit-up on panel cover template looking good.
and fit-up on panel cover template looking good.
You do not have the required permissions to view the files attached to this post.
Sometimes you just have to take the leap
and build your wings on the way down...
Gotta Fly...
and build your wings on the way down...
Gotta Fly...
-
planecrazzzy
- Site Admin
- Posts: 1154
- Joined: Sat Jan 01, 2005 1:23 pm
- Location: Minnesota
- Contact:
Re: Final Assembly
Fitting the 90 degree mahogany plywood...
Transferring Paper Jig marks
Transferring Paper Jig marks
You do not have the required permissions to view the files attached to this post.
Sometimes you just have to take the leap
and build your wings on the way down...
Gotta Fly...
and build your wings on the way down...
Gotta Fly...
-
planecrazzzy
- Site Admin
- Posts: 1154
- Joined: Sat Jan 01, 2005 1:23 pm
- Location: Minnesota
- Contact:
Re: Final Assembly
Flat Black
You do not have the required permissions to view the files attached to this post.
Sometimes you just have to take the leap
and build your wings on the way down...
Gotta Fly...
and build your wings on the way down...
Gotta Fly...
-
planecrazzzy
- Site Admin
- Posts: 1154
- Joined: Sat Jan 01, 2005 1:23 pm
- Location: Minnesota
- Contact:
Re: Final Assembly
Fixing a print mistake...
.
I need to Weld the HS Ribs...to hold the shape as I cut off the Leading edge 3/8" tube
I'll change it to 1/2" leading edge
.
Gotta Fly...
.
I need to Weld the HS Ribs...to hold the shape as I cut off the Leading edge 3/8" tube
I'll change it to 1/2" leading edge
.
Gotta Fly...
You do not have the required permissions to view the files attached to this post.
Sometimes you just have to take the leap
and build your wings on the way down...
Gotta Fly...
and build your wings on the way down...
Gotta Fly...
-
planecrazzzy
- Site Admin
- Posts: 1154
- Joined: Sat Jan 01, 2005 1:23 pm
- Location: Minnesota
- Contact:
Re: Final Assembly
.
The old tube is left on as "Stubs"...
The 1/2" tube slips over it....
I need to clean them up better , Then Tack them (MIG)
and I'll TIG weld them.
The tubes I cut OUT , were used in the Landing gear stiffeners for the brake line to travel through it
The old tube is left on as "Stubs"...
The 1/2" tube slips over it....
I need to clean them up better , Then Tack them (MIG)
and I'll TIG weld them.
The tubes I cut OUT , were used in the Landing gear stiffeners for the brake line to travel through it
You do not have the required permissions to view the files attached to this post.
Sometimes you just have to take the leap
and build your wings on the way down...
Gotta Fly...
and build your wings on the way down...
Gotta Fly...
-
planecrazzzy
- Site Admin
- Posts: 1154
- Joined: Sat Jan 01, 2005 1:23 pm
- Location: Minnesota
- Contact:
Re: Final Assembly
.
Getting closer...
They need to be painted
.
Gotta Fly...
Getting closer...
They need to be painted
.
Gotta Fly...
You do not have the required permissions to view the files attached to this post.
Sometimes you just have to take the leap
and build your wings on the way down...
Gotta Fly...
and build your wings on the way down...
Gotta Fly...
-
planecrazzzy
- Site Admin
- Posts: 1154
- Joined: Sat Jan 01, 2005 1:23 pm
- Location: Minnesota
- Contact:
Re: Final Assembly ( In Progress )
.
I have skipped around because the weather isn't good for painting.
.
I built the Spring Rod "Dampeners"...
In fact , the tube I cut off the HS is being put inside the dampeners for running
a brake tube through it
They were wrapped with Bi axial Fiberglass and painted with two part Epoxy
.
viewtopic.php?f=320&t=18836#p50542
.
Gotta Fly...
.
.
You do not have the required permissions to view the files attached to this post.
Sometimes you just have to take the leap
and build your wings on the way down...
Gotta Fly...
and build your wings on the way down...
Gotta Fly...
-
planecrazzzy
- Site Admin
- Posts: 1154
- Joined: Sat Jan 01, 2005 1:23 pm
- Location: Minnesota
- Contact:
Re: Final Assembly ( In Progress )
;
More final assembly
The Dampeners are finished and Epoxy Primed
Brakes have been finished along with some Heat/Noise baffling.
detail about it here:viewtopic.php?f=320&t=18196#p51035
.
Outer panel fit-up , but not final
More final assembly
The Dampeners are finished and Epoxy Primed
Brakes have been finished along with some Heat/Noise baffling.
detail about it here:viewtopic.php?f=320&t=18196#p51035
.
Outer panel fit-up , but not final
You do not have the required permissions to view the files attached to this post.
Sometimes you just have to take the leap
and build your wings on the way down...
Gotta Fly...
and build your wings on the way down...
Gotta Fly...
-
planecrazzzy
- Site Admin
- Posts: 1154
- Joined: Sat Jan 01, 2005 1:23 pm
- Location: Minnesota
- Contact:
Re: Final Assembly ( In Progress )
.
As I'm looking for room to mount the throttle and mixture controls...It seems I need to modify my stick.
There were other times it felt too crowded...I knew this day would come.
i made it easy to remove ..
I only cut the left side of the control stick , the right side was set-up to be removable...and still works.
I made two places to hold the stick,,, I like the "Y"...we'll see...
.
Here's a few pictures ,Art with function...
.
.
Gotta Fly...
You do not have the required permissions to view the files attached to this post.
Sometimes you just have to take the leap
and build your wings on the way down...
Gotta Fly...
and build your wings on the way down...
Gotta Fly...
-
planecrazzzy
- Site Admin
- Posts: 1154
- Joined: Sat Jan 01, 2005 1:23 pm
- Location: Minnesota
- Contact:
Re: Final Assembly ( In Progress )
'
Flap handle with Lacing...
The Macrame came in handy again.
This is a very tight knot using the lacing (and it's wax)
Good traction for your grip.
.
Added a little spice in the pattern, it's simple to do.
You can learn it here; viewtopic.php?f=180&t=3037
.
.
Gotta Fly...
.
.
Flap handle with Lacing...
The Macrame came in handy again.
This is a very tight knot using the lacing (and it's wax)
Good traction for your grip.
.
Added a little spice in the pattern, it's simple to do.
You can learn it here; viewtopic.php?f=180&t=3037
.
.
Gotta Fly...
.
.
You do not have the required permissions to view the files attached to this post.
Sometimes you just have to take the leap
and build your wings on the way down...
Gotta Fly...
and build your wings on the way down...
Gotta Fly...
-
planecrazzzy
- Site Admin
- Posts: 1154
- Joined: Sat Jan 01, 2005 1:23 pm
- Location: Minnesota
- Contact:
Re: Final Assembly ( In Progress )
.
While I'm figuring out the throttle area...
.
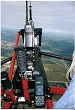
I put the seat covers on... I'm trying to get the flying position , So I have a better Idea about Throttle and Mixture positions on the panel,
and others along this trail THROUGH the firewall.
As I'm looking at the HOLE I gotta dig that Flap handle out of....It looked... and WAS cramped
To get your hand wrapped in there and hit the button with your thumb COULD BE DONE...
By putting the T on it...I can snatch it outa the hole easy...
The Thumb operation still works,,,The T only extended the button 1/8"
.
Gotta Fly...
..
While I'm figuring out the throttle area...
.
I put the seat covers on... I'm trying to get the flying position , So I have a better Idea about Throttle and Mixture positions on the panel,
and others along this trail THROUGH the firewall.
As I'm looking at the HOLE I gotta dig that Flap handle out of....It looked... and WAS cramped
To get your hand wrapped in there and hit the button with your thumb COULD BE DONE...
By putting the T on it...I can snatch it outa the hole easy...
The Thumb operation still works,,,The T only extended the button 1/8"
.
Gotta Fly...
..
You do not have the required permissions to view the files attached to this post.
Sometimes you just have to take the leap
and build your wings on the way down...
Gotta Fly...
and build your wings on the way down...
Gotta Fly...